DIY Plaster Coffee Table Tray
Want the look of plaster without the cost or the mess in making one? See how to make this DIY Plaster Coffee Table Tray project with just a few simple supplies.

We have been loving all of the plaster inspired home decor pieces and furniture lately. There is something almost calming and tranquil about the textured white look and feel of plaster.
It seems like every furniture store has some kind of plaster table right now. Side tables, coffee tables and console tables. You can also find trays, bowls and more.
Plaster can give a modern look but also a Boho feel as well to a space. We used a 12 inch craft wood circle for this project, but you could also use a thrifted or old wood tray of any kind.

Trays are a great styling piece for any table, whether a coffee table or console table. We made this fabric lined tray years ago and still use it.
Check out some plaster inspiration below…
Plaster Furniture and home decor
Plaster side table from Crate & Barrel
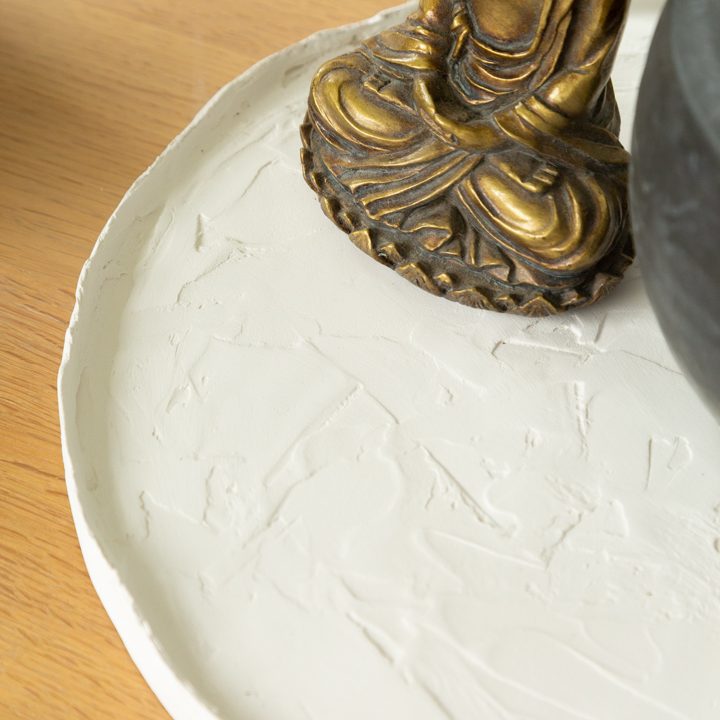
How to make the DIY Plaster Coffee Table Tray
Can you guess what we used to make this DIY Plaster Coffee Table Tray? We will give you a hint…. it goes on pink and dries to white! DryDex Spackling is the answer! You know, the stuff you can use to fill holes in your walls. This stuff is so easy to work with. Dries quickly and you can sand and even paint it.
Supplies
Foam Brush

DIY Plaster Coffee Table Tray
Love the look of plaster for ome decor? Learn how to make this DIY Plaster Coffee Table Tray using some simple materials.
Materials
- DryDex Spackling
- 12 inch craft wood circle
- iron on veneer tape
- Mod Podge
Tools
- Spackle knife
- foam brush
- sanding block
Instructions
- Wrap veneer tape around the edge of the wood circle. Use an iron to adhere.
- Apply spackling with knife all over the top of the wood circle.
- Next apply spackling around the inside edges of the veneer tape. Note - you do not have to use veneer tape. You can just plaster the top and edges of wood circle.
- Apply spackling to the outside edges. It is easier to do this by setting the wood circle tray on top of a bowl or glass.
- Allow to dry. The spackling will go on pink. When it is dry, it turns white.
- Sand the top and edges with a sanding block.
- Aftet it is completely dry, apply a thin coat of Mod Podge with a foam brush. This will help seal the spackling.
Notes
You can add a second layer of spackling if you would like - this gives thicker textured look to the tray.
Recommended Products
As an Amazon Associate and member of other affiliate programs, I earn from qualifying purchases.

View this post on Instagram