Shibori Indigo Dye Series – Pillows
 A few weeks ago we shared our first post in our Indigo Dye Series, a beautiful summer scarf. Today we are sharing how to make different types of pillow covers using hand dyed fabric. When we hosted the Craft Night, we indigo dyed just about every piece of natural white fabric we had! Indigo is a natural dye and an easy way to create resist patterns on fabric. We used a Japanese dyeing technique called shibori. Read more for the full tutorial…
 Supplies: Indigo Dye Kit
 // 1 yard of white 100% cotton fabric
// 2- 5 gallon buckets // rubber bands // wood blocks or tiles // rubber gloves // drop cloth or trash bags // scissors // paint stick // PVC pipe // twine
 A few tips prior to dyeing – read the pamphlet that comes with the kit. It is full of valuable information! The more you know going into it, the easier it will be. Make sure the fabric you are using is 100% natural. The indigo dye will not dye anything other than 100% natural fibers.
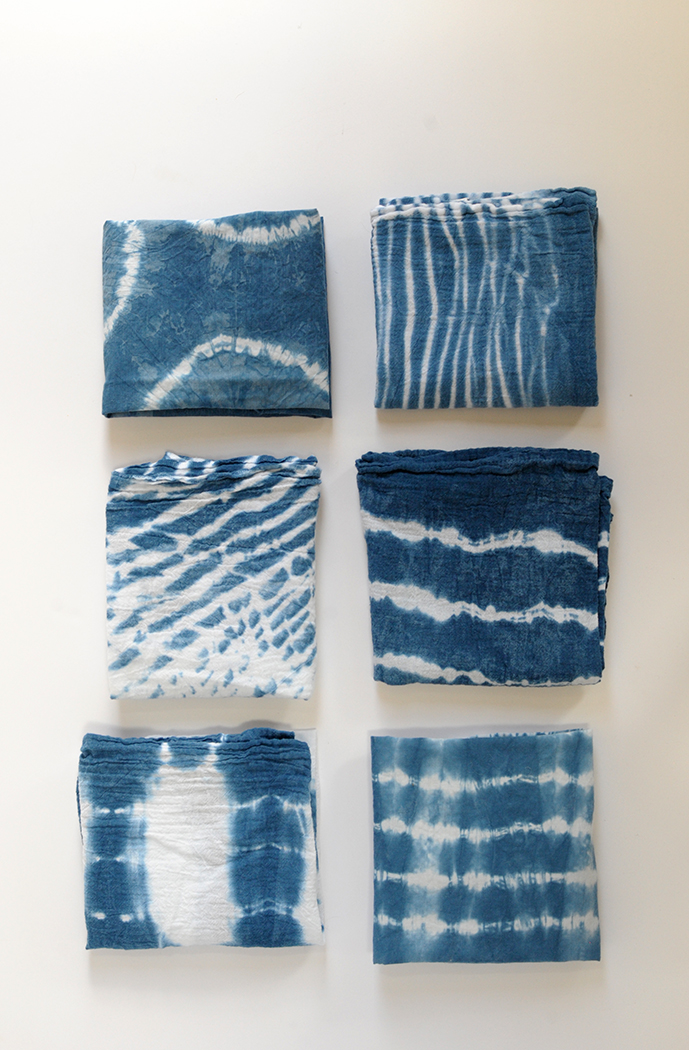
ARASHI method: I made three pillow covers using the hand dyed fabrics. We used the shibori method called Arashi, or pole-wrapping method to create the fabric for the body pillow.
Use fabric pre-cut in the dimensions needed to make a body pillow. I used 2 pieces of 20 in x 61 in of 100% cotton fabric. Soak the first piece of fabric completely and ring out.
 1. Wrap the fabric around a PVC pipe at an angle (or any pipe like material you have on hand).
2. Next, tie a knot with the twine on the bottom of pipe around the fabric. Wrap the twine around the fabric tightly.
3. Next, push the fabric down towards the bottom of pipe.
4. We recommend doing this in sections as it gets difficult to scrunch the fabric down the higher up the pole you go.
5. Keep pushing down. Two sets of hands are great for this part!
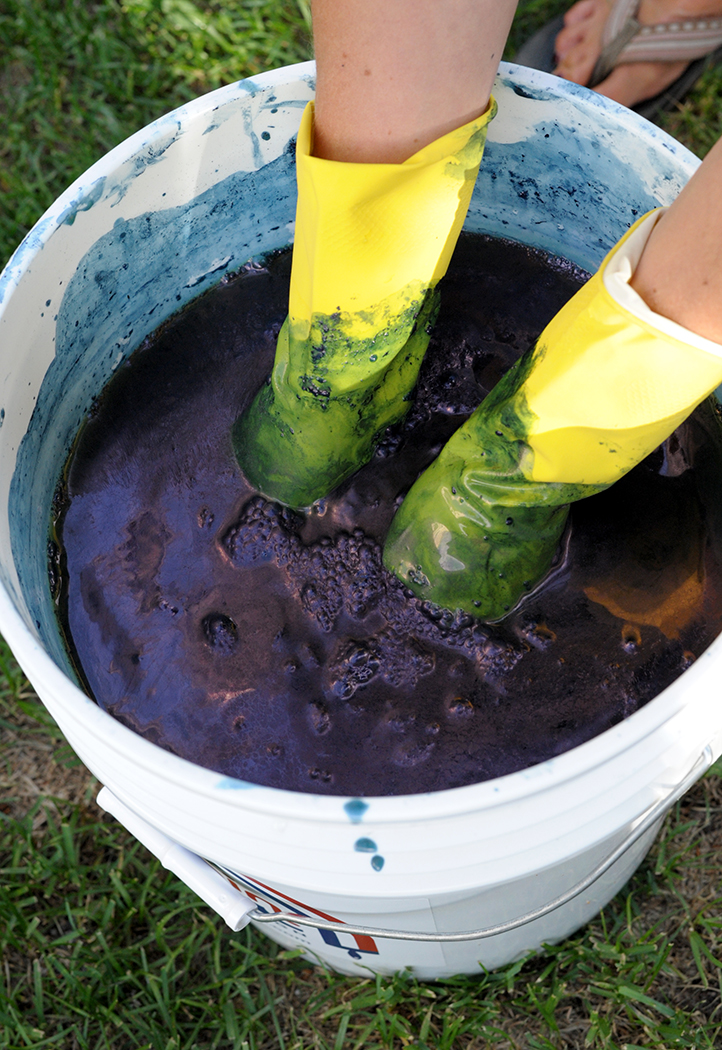 6. Wearing rubber gloves, submerge the fabric into the dye bucket. Hold and massage the fabric under the dye (without touching the bottom of the bucket) for 3 to 5 minutes.
7. Remove the fabric from the dye. The fabric will look green, not indigo. Let rest and oxidize. You will see the magic happen – from green to indigo! Once oxidized, you can repeat the dyeing process for a deeper, darker indigo color. We repeated a second time. Remove the rubber bands and wood/tiles and lay flat for the full oxidization.
 8. Wash in cold and tumble dry. Repeat all of the steps for second piece of fabric.
KUMO method: This is a twist and bind method, typically using rubber bands and small rocks. We will share this technique in our next Indigo Dye series post!
TIE DYE method: We used a basic line tie dye technique for the larger square pillow front. You get a stripe look with this method. Use two pieces of 21 inch fabric cute into squares.
 Follow the steps in the Arashi method for dyeing. Soak fabric in water and ring out. Determine where you want your stripes to be on the pillow. I did a bit off center and to one side. Gather the fabric together with your hands. Bind a section with a rubber band tightly. I left about 2 inches between bonded sections.
More indigo dye instructions here.

 Enjoy creating your own hand dyed fabrics!
– Sara
Photos by Melissa Fenlon for alice & lois design studios. All rights reserved.


amazing results!
Thanks Alka!
I love indigo fabrics! This looks like a messy great time. Going to try this!
You’re going to love it. And you have to send pics of what you make 🙂
Your Hand died Fabric turned out Absolutely Beautiful! Thank you for a great tutorial! You’ve inspired me to give it a try and pillows or even pillow covers are the perfect item to start with.
Leigha, you’re going to love it!
This makes it look so easy. I have done the quart jar dyeing, and had alot of fun with it. Thanks for sharing,
Thanks Karen – it is so much fun!